Hadoop HDFS RPC通信框架
前言
单个 HDFS 集群中可能存在成百上千个 DataNode ,但默认情况下 NameNode 只有一个 , 各个节点不断的进行内部通信,如果不能快速的处理掉通信消息,可能会导致掉节点,或者数据传输缓慢等问题。因此HDFS内部集群对内部RPC通信具有较高的性能要求。
Protobuf简介
在 HDFS 中,为了提升内部通信的传输效率,整个RPC通信框架使用 Google 的 Protobuf 序列化框架进行数据传输。为了方便后续理解,这里先对 Protobuf 进行简单介绍。
数据传输
Protobuf 首先是一个跨语言的数据传输框架。把它和 XML 和 JSON进行对比可以看出
| 语言 | 特点 | 可读性 | 数据Size | 解析效率 |
|---|---|---|---|---|
| Protobuf | 将数据内容解析成纯字节形式传输 | 数据以字节形式存在,不具备可读性 | 占用数据量少 | 直接读取数据内容,效率高 |
| XML和JSON | 引入额外文本构造出格式化数据 | 额外文本使得数据具备良好的可读性 | 数据以字符形式存在,且额外文本占用大量空间 | 需要解析剔除额外数据,效率低 |
XML和Json都是将数据封装成一个格式化文本,因此在必要的传输数据之外,还有大量的额外文本进行状态描述。而 Protobuf 通过将数据字段序列化成为一串不可读的字节码,同XML和Json相比,对于同样的数据,它所需要传输的数据量更小,解析的速度更快。
Protobuf 也是一门天生的跨语言数据传输框架。 对于不同的语言,都用同一个 .proto 的文件进行数据描述,如下:
1 | message User { |
代码中的 User 数据,可以通过 Google 或者三方的 protobuf 处理工具,被转化为特定编程语言下的数据对象。
例如,在Java代码中,通过 .proto 文件生成一个 AddressBook 数据类,那么生成的 Java 文件中会自带 mergeFrom 和 writeTo 方法如下:1
2
3
4
5
6
7// 从输入流中反序列化数据
AddressBook.Builder addressBook = AddressBook.newBuilder();
addressBook.mergeFrom(new FileInputStream(args[0]));
// 序列化数据到输入流
FileOutputStream output = new FileOutputStream(args[0]);
addressBook.build().writeTo(output);
通过Protobuf内部的IO逻辑,我们可以将指定的数据转化为少量的字节码进行传输,从而提升整体的传输效率。
对于任意语言,只要以同样的方式记录和读取同一份字节码数据就可以得到同样的数据对象,从而保证序列化数据的可还原性。同时,在数据的序列化过程中,由于没有额外文本的参与,也不需要保持数据在传输过程中的可读性,因此对于同一个数据,Protobuf拥有比XML和Json更小的数据量和更快的解析速度。
RPC调用
Protobuf 除了实现数据的传输作用以外,还实现了一套RPC远程调用框架。
定义一个 .proto 文件如下1
2
3
4
5option java_generic_services = true;
service ReconfigurationProtocolService {
rpc getReconfigurationStatus(GetReconfigurationStatusRequestProto)
returns(GetReconfigurationStatusResponseProto);
}
使用Protobuf编译工具进行处理之后,可以得到一个 ReconfigurationProtocolService 接口,例如上方代码对应的接口中会有一个叫做 getReconfigurationStatus,参数类型为GetReconfigurationStatusRequestProto, 返回值为GetReconfigurationStatusResponseProto 的方法。
1 | // 构造BlockingService |
在 Java 文件中,通过动态代理得到一个BlockingService对象,内部包裹一个实现了 ReconfigurationProtocolService.BlockingInterface 接口的对象。
当需要使用RPC服务时,系统通过传输需要调用的方法名和相关的调用参数,使用 BlockingService::callBlockingMethod,就可以在Server端解析调用逻辑,实现RPC远程调用。
RPC通信的逻辑实现
言归正传,我们回到 HDFS 的内部通信机制本身。
如上图中,Proxy和Impl是对同一个RPC调用接口的实现类,当Proxy中的接口被调用时,通过Client发送消息到 Server ,Server 会按照标准数据格式进行解析,再调用Server侧的 Impl方法进行执行,并返回结果数据。Client 发送消息到 Server 的过程对于接口访问而言是透明的,对于使用者来说,他在本地执行 Proxy 的接口,会得到具有相同接口的 Impl 的调用结果。
不同的RPC框架的具体实现逻辑不尽相同,在HDFS中,RPC.Server类扮演RPC框架中的 Server 角色,处理响应内部通信请求; Client 类扮演RPC框架中的 Client 角色,负责调用消息的发送和结果数据接收。
接下来会针对 Server 和 Client 的进行代码逻辑的走读。
Server
RPC.Server的源码路径是 $src/hadooop-common-project/hadoop-common/src/main/java/org/apache/hadoop/ipc/RPC.java。
在 RPC 类中有一个 Builder 类负责构造 RPC.Server,在构造方法中我们看到:1
2
3
4
5
6public Server build() throws IOException, HadoopIllegalArgumentException {
return getProtocolEngine(this.protocol, this.conf).getServer(
this.protocol, this.instance, this.bindAddress, this.port,
this.numHandlers, this.numReaders, this.queueSizePerHandler,
this.verbose, this.conf, this.secretManager, this.portRangeConfig);
}
默认情况下,通过 getProtocolEngine() 都是得到一个 ProtobufRpcEngine 对象,再通过ProtobufRpcEngine::getServer构造出 ProtobufRpcEngine.Server 对象。
ProtobufRpcEngine.Server 是 Server 的子类,整个内部通信机制在 Server 类中就已经实现了,下面是 Server 中的数据处理流程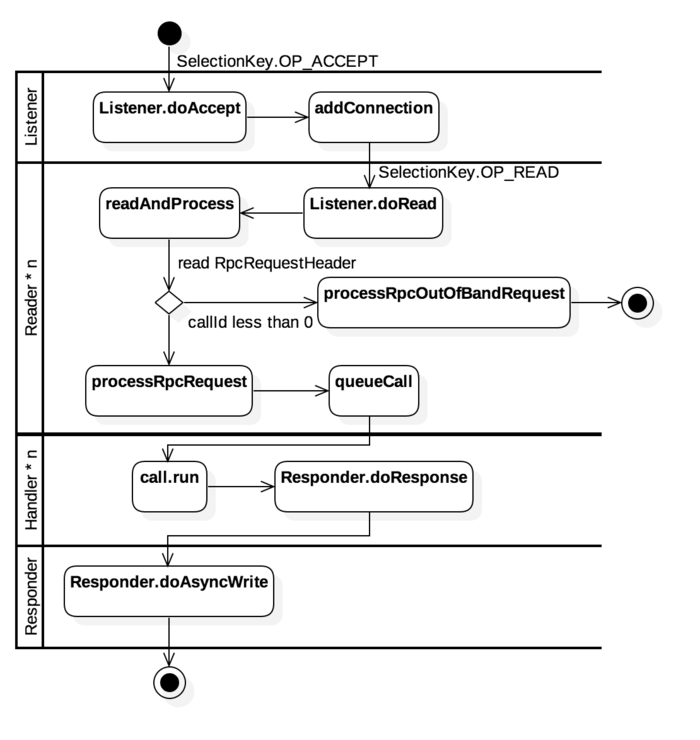
Server类中使用了四种类型的线程类,分别是Listener,Reader,Handler和Responder。如上图所示,为了方便表示各个线程间的通信逻辑,使用泳道代表着对应类型的线程类操作时锁使用的关键方法
Listener
Listener 作为单线程任务负责监听指定端口的socket的 ACCEPT 请求,当新的 socket链接到来时,将其封装成一个 Connection 对象,通过addConnection添加Reader的处理队列中。
Server 中只有一个 Listener 线程负责接收新的socket请求,但有多个 Reader 线程,在Listener::doAccept 中会根据以下代码尽可能将 Connection 平均分配到各个 Reader中,让多个线程可以同时读取不同的 socket 数据,从而避免Listener单线程引起的性能瓶颈。1
2
3
4Reader getReader() {
currentReader = (currentReader + 1) % readers.length;
return readers[currentReader];
}
Reader
Reader负责内部通信数据的解析工作,它不断尝试从Connection所包装的socket对象中读取数据。当发现某个 socket 可读时,通过 readAndProcess-> processOneRpc 处理到来的消息。1
2
3
4
5
6
7
8
9
10
11
12private void processOneRpc(ByteBuffer bb) throws IOException, WrappedRpcServerException, InterruptedException {
final RpcWritable.Buffer buffer = RpcWritable.Buffer.wrap(bb);
final RpcRequestHeaderProto header = getMessage(RpcRequestHeaderProto.getDefaultInstance(), buffer);
callId = header.getCallId();
if (callId < 0) {
processRpcOutOfBandRequest(header, buffer);
} else if(!connectionContextRead) {
throw new WrappedRpcServerException();
} else {
processRpcRequest(header, buffer);
}
}
从上面的代码可以看出,每次从 socket 请求传来的数据请求都必然带着一个 RpcRequestHeaderProto 对象,这个对象中封装着后续参数的相关信息,就像 Http 协议中的头信息。
当 socket 初次建立链接时,需要通过 procesRpcOutOfBandRequest 进行链接初始化,初始化时的 callId < 0。初始化完成之后,后续请求通过 processRpcRequest 进行消费。1
2
3
4
5
6
7
8
9
10
11
12
13
14
15
16
17
18
19
20
21
22
23
24
25
26
27
28
29
30
31
32
33
34
35
36
37
38
39
40
41
42
43
44
45
46
47
48
49
50
51
52
53
54
55
56
57
58
59
60
61
62
63
64
65
66
67
68
69private void processRpcRequest(RpcRequestHeaderProto header,
RpcWritable.Buffer buffer) throws RpcServerException,
InterruptedException {
Class<? extends Writable> rpcRequestClass =
getRpcRequestWrapper(header.getRpcKind());
if (rpcRequestClass == null) {
LOG.warn("Unknown rpc kind " + header.getRpcKind() +
" from client " + getHostAddress());
final String err = "Unknown rpc kind in rpc header" +
header.getRpcKind();
throw new FatalRpcServerException(
RpcErrorCodeProto.FATAL_INVALID_RPC_HEADER, err);
}
Writable rpcRequest;
try { //Read the rpc request
rpcRequest = buffer.newInstance(rpcRequestClass, conf);
} catch (RpcServerException rse) { // lets tests inject failures.
throw rse;
} catch (Throwable t) { // includes runtime exception from newInstance
LOG.warn("Unable to read call parameters for client " +
getHostAddress() + "on connection protocol " +
this.protocolName + " for rpcKind " + header.getRpcKind(), t);
String err = "IPC server unable to read call parameters: "+ t.getMessage();
throw new FatalRpcServerException(
RpcErrorCodeProto.FATAL_DESERIALIZING_REQUEST, err);
}
TraceScope traceScope = null;
if (header.hasTraceInfo()) {
if (tracer != null) {
// If the incoming RPC included tracing info, always continue the
// trace
SpanId parentSpanId = new SpanId(
header.getTraceInfo().getTraceId(),
header.getTraceInfo().getParentId());
traceScope = tracer.newScope(
RpcClientUtil.toTraceName(rpcRequest.toString()),
parentSpanId);
traceScope.detach();
}
}
CallerContext callerContext = null;
if (header.hasCallerContext()) {
callerContext =
new CallerContext.Builder(header.getCallerContext().getContext())
.setSignature(header.getCallerContext().getSignature()
.toByteArray())
.build();
}
RpcCall call = new RpcCall(this, header.getCallId(),
header.getRetryCount(), rpcRequest,
ProtoUtil.convert(header.getRpcKind()),
header.getClientId().toByteArray(), traceScope, callerContext);
// Save the priority level assignment by the scheduler
call.setPriorityLevel(callQueue.getPriorityLevel(call));
try {
internalQueueCall(call);
} catch (RpcServerException rse) {
throw rse;
} catch (IOException ioe) {
throw new FatalRpcServerException(
RpcErrorCodeProto.ERROR_RPC_SERVER, ioe);
}
incRpcCount(); // Increment the rpc count
}
这里根据RpcRequestHeaderProto中包含的body类型解析出对应的数据类,将其封装成一个 RpcCall 对象,放入 Handler 的消费队列中。
Handler
Handler 线程负责具体指令的执行工作。1
2
3
4
5
6
7
8
9
10final Call call = callQueue.take(); // pop the queue; maybe blocked here
CurCall.set(call);
// always update the current call context
CallerContext.setCurrent(call.callerContext);
UserGroupInformation remoteUser = call.getRemoteUser();
if (remoteUser != null) {
remoteUser.doAs(call);
} else {
call.run();
}
在 Handler 的循环队列中,不断从 callQueue 中获取需要消费的任务信息,然后通过 call.run() 进行任务执行。1
2
3
4
5
6
7
8
9
10
11
12
13
14
15
16
17
18
19
20
21
22
23
24
25
26
27@Override
public Void run() throws Exception {
if (!connection.channel.isOpen()) {
Server.LOG.info(Thread.currentThread().getName() + ": skipped " + this);
return null;
}
Writable value = null;
ResponseParams responseParams = new ResponseParams();
try {
value = call(
rpcKind, connection.protocolName, rpcRequest, timestamp);
} catch (Throwable e) {
populateResponseParamsOnError(e, responseParams);
}
if (!isResponseDeferred()) {
setupResponse(this, responseParams.returnStatus,
responseParams.detailedErr,
value, responseParams.errorClass, responseParams.error);
sendResponse();
} else {
if (LOG.isDebugEnabled()) {
LOG.debug("Deferring response for callId: " + this.callId);
}
}
return null;
}
在 RpcCall::run 中我们看到,系统实际上是通过Server::call方法执行的,这个方法在 RPC.Server 中被实现。1
2
3
4
5
6
7
8
9
10
11
12
13
14
15
16
17
18
19
20
21
22
23
24
25
26
27
28
29static { // Register the rpcRequest deserializer for ProtobufRpcEngine
org.apache.hadoop.ipc.Server.registerProtocolEngine(
RPC.RpcKind.RPC_PROTOCOL_BUFFER, RpcProtobufRequest.class,
new Server.ProtoBufRpcInvoker());
}
@Override
public Writable call(RPC.RpcKind rpcKind, String protocol,
Writable rpcRequest, long receiveTime) throws Exception {
return getRpcInvoker(rpcKind).call(this, protocol, rpcRequest,
receiveTime);
}
// Server.ProtoBufRpcInvoker
public Writable call(RPC.Server server, String connectionProtocolName,
Writable writableRequest, long receiveTime) throws Exception {
RpcProtobufRequest request = (RpcProtobufRequest) writableRequest;
RequestHeaderProto rpcRequest = request.getRequestHeader();
String methodName = rpcRequest.getMethodName();
String declaringClassProtoName =
rpcRequest.getDeclaringClassProtocolName();
long clientVersion = rpcRequest.getClientProtocolVersion();
ProtoClassProtoImpl protocolImpl = getProtocolImpl(server,
declaringClassProtoName, clientVersion);
BlockingService service = (BlockingService) protocolImpl.protocolImpl;
result = service.callBlockingMethod(methodDescriptor, null, param);
}
从源码中可以看到,RPC.Server::call经过层层路径,最终在Server.ProtoBufRpcInvoker 根据传入的数据找到对应的BlockingService,利用 Protobuf (这里没有使用Protobuf内置的RpcChannel,而是自己手动调用BlockingService::callBlockingMethod)实现方法的调用。
Responder
在 Reponder 线程的 while 循环中,我们看到当socket可写时,会尝试调用 doAsyncWrite->processResponse 进行写入操作1
2
3
4
5
6
7
8
9
10
11
12
13
14
15
16
17
18
19
20
21
22
23
24
25private boolean processResponse(LinkedList<RpcCall> responseQueue,
boolean inHandler) throws IOException {
call = responseQueue.removeFirst();
SocketChannel channel = call.connection.channel;
int numBytes = channelWrite(channel, call.rpcResponse);
if (numBytes < 0) {
return true;
}
if (!call.rpcResponse.hasRemaining()) {
...
} else {
call.connection.responseQueue.addFirst(call);
}
return done;
}
private int channelWrite(WritableByteChannel channel,
ByteBuffer buffer) throws IOException {
int count = (buffer.remaining() <= NIO_BUFFER_LIMIT) ?
channel.write(buffer) : channelIO(null, channel, buffer);
if (count > 0) {
rpcMetrics.incrSentBytes(count);
}
return count;
}
Responder会将得到的 response 写入socket 的输出流中,返回给Client。
Client
Client 的源码路径是 $src/hadoop-common-project/hadoop-common/src/main/java/org/apache/hadoop/ipc/Client.java 。1
2
3
4
5
6
7
8
9
10
11
12@Override
@SuppressWarnings("unchecked")
public <T> ProtocolProxy<T> getProxy(Class<T> protocol, long clientVersion,
InetSocketAddress addr, UserGroupInformation ticket, Configuration conf,
SocketFactory factory, int rpcTimeout, RetryPolicy connectionRetryPolicy,
AtomicBoolean fallbackToSimpleAuth) throws IOException {
final Invoker invoker = new Invoker(protocol, addr, ticket, conf, factory,
rpcTimeout, connectionRetryPolicy, fallbackToSimpleAuth);
return new ProtocolProxy<T>(protocol, (T) Proxy.newProxyInstance(
protocol.getClassLoader(), new Class[]{protocol}, invoker), false);
}
Client 端通过 ProtobufRpcEngine::getProxy 构建出一个动态代理的接口对象。当 Client 访问接口时,通过 Invoker 类通知 Client 发送请求给 Server。1
2
3
4
5
6
7
8
9public Message invoke(Object proxy, final Method method, Object[] args) throws ServiceException {
RequestHeaderProto rpcRequestHeader = constructRpcRequestHeader(method);
final Message theRequest = (Message) args[1];
final RpcWritable.Buffer val;
val = (RpcWritable.Buffer) client.call(RPC.RpcKind.RPC_PROTOCOL_BUFFER,
new RpcProtobufRequest(rpcRequestHeader, theRequest), remoteId,
fallbackToSimpleAuth);
return getReturnMessage(method, val);
}
Invoker 会根据访问接口的签名信息构造出一个 RequestHeaderProto 对象,在上一小节中,我们看到当 Server 接收到 socket 信息时,会先读取这个 RequestHeaderProto,了解当前调用的方法名称,然后进行后续分发。
RequestHeaderProto 对象随着 Message 对象一起被封装成一个 Call 对象传递给 Client 进行发送,每一个 Call 对象会有一个唯一的 callId, 便于在接收到返回信息中,返回给指定的 Call。1
2
3
4
5
6
7
8
9
10
11
12
13
14
15
16
17
18
19Writable call(RPC.RpcKind rpcKind, Writable rpcRequest,
ConnectionId remoteId, int serviceClass,
AtomicBoolean fallbackToSimpleAuth) throws IOException {
final Connection connection = getConnection(remoteId, call, serviceClass,
fallbackToSimpleAuth);
connection.sendRpcRequest(call);
}
private Connection getConnection(ConnectionId remoteId,
Call call, int serviceClass, AtomicBoolean fallbackToSimpleAuth)
throws IOException {
connection = connections.get(remoteId);
Connection existing = connections.putIfAbsent(remoteId, connection);
if (connection == null) {
connection = new Connection(remoteId, serviceClass);
}
connection.setupIOstreams(fallbackToSimpleAuth);
return connection;
}
Client 有一个 connections 的 Connection 队列负责同各个节点的NameNode 进行通信,首次构造 Connection 对象后,通过 setupIOstreams初始化链接信息,同时发送相关的设置信息到 Server::processRpcOutOfBandRequest 中进行Server侧的初始化。
当有一个可用的Connection 后,通过 connection::sendRpcRequest将请求发送给对应的Server。
同时Connection 也是一个线程类,在 setupIOstreams 的时候会启动接收线程。接收线程在收到消息之后,根据消息中的唯一callId将返回数据返回给指定的 Call 对象,完成整个 Client 的通信流程。
NameNode 和 DataNode的心跳逻辑
接下来,以 NameNode 和 DataNode的心跳发送机制为例,举例说明内部通信的流程。
在 HDFS 中,心跳是单向的,总是由DataNode主动上报当前状态到NameNode中,因此对于心跳而言,NameNode是Server,DataNode是Client。
DataNode
在前一篇文章中,我介绍了DataNode 在启动的时候,会构造一个 BlockPoolManager 对象,在 BlockPoolManager 中有一个 BPOfferService的集合对象。1
2
3
4
5
6
7
8
9
10
11
12BPOfferService(List<InetSocketAddress> nnAddrs, List<InetSocketAddress> lifelineNnAddrs, DataNode dn) {
for (int i = 0; i < nnAddrs.size(); ++i) {
this.bpServices.add(new BPServiceActor(nnAddrs.get(i),
lifelineNnAddrs.get(i), this));
}
}
void start() {
for (BPServiceActor actor : bpServices) {
actor.start();
}
}
HDFS Federation是为解决HDFS单点故障而提出的NameNode水平扩展方案,该方案允许HDFS创建多个Namespace以提高集群的扩展性和隔离性。
在Federation中新增了block-pool的概念,block-pool就是属于单个Namespace的一组block,每个DataNode为所有的block-pool存储block,可以理解block-pool是一个重新将block划分的逻辑概念,同一个DataNode中可以存储属于多个block-pool的多个block。
每一个BPOfferService(block-pool/namespace)对应着一个 NameService , 对于 NameService 的每一个 NameNode(代表和NameService关联的active状态或者standby状态的NameNode) 节点,会对应 BPServiceActor 的Runnable类。在启动BPOfferService的时候,其实就是启动每一个BPServiceActor类。1
2
3
4
5
6
7
8
9
10
11
12
13
14
15
16
17
18
19
20
21
22
23
24void start() {
bpThread = new Thread(this, formatThreadName("heartbeating", nnAddr));
bpThread.start();
}
@Override
public void run() {
connectToNNAndHandshake();//连接NameNode
while (shouldRun()) {
offerService();//提供服务
}
}
private void offerService() throws Exception {
while (shouldRun()) {
final long startTime = scheduler.monotonicNow();
final boolean sendHeartbeat = scheduler.isHeartbeatDue(startTime);
HeartbeatResponse resp = null;
if (sendHeartbeat) {
resp = sendHeartBeat(requestBlockReportLease);
}
....
}
}
BPServiceActor类本身是一个Runnable的实现类,在线程循环中,先链接到NameNode ,再在 while 循环中不断offerService。
在offerService中,通过 sendHeartBeat 进行周期性的心跳发送。1
2
3
4
5
6
7
8
9
10
11
12
13
14
15
16
17
18
19
20
21
22
23
24
25
26
27
28
29
30
31
32
33
34
35
36
37
38
39
40
41
42
43
44
45
46
47
48
49
50
51
52
53private void connectToNNAndHandshake() throws IOException {
// get NN proxy
bpNamenode = dn.connectToNN(nnAddr);
// First phase of the handshake with NN - get the namespace
// info.
NamespaceInfo nsInfo = retrieveNamespaceInfo();
// Verify that this matches the other NN in this HA pair.
// This also initializes our block pool in the DN if we are
// the first NN connection for this BP.
bpos.verifyAndSetNamespaceInfo(this, nsInfo);
// Second phase of the handshake with the NN.
register(nsInfo);
}
// All heartbeat messages include following info:
// -- Datanode name
// -- data transfer port
// -- Total capacity
// -- Bytes remaining
HeartbeatResponse sendHeartBeat(boolean requestBlockReportLease)
throws IOException {
scheduler.scheduleNextHeartbeat();
scheduler.updateLastHeartbeatTime(monotonicNow());
return bpNamenode.sendHeartbeat(bpRegistration,
reports,
dn.getFSDataset().getCacheCapacity(),
dn.getFSDataset().getCacheUsed(),
dn.getXmitsInProgress(),
dn.getXceiverCount(),
numFailedVolumes,
volumeFailureSummary,
requestBlockReportLease);
}
// DatanodeProtocolClientSideTranslatorPB.java
@Override
public HeartbeatResponse sendHeartbeat(DatanodeRegistration registration,
StorageReport[] reports, long cacheCapacity, long cacheUsed,
int xmitsInProgress, int xceiverCount, int failedVolumes,
VolumeFailureSummary volumeFailureSummary,
boolean requestFullBlockReportLease) throws IOException {
HeartbeatRequestProto.Builder builder = HeartbeatRequestProto.newBuilder()
.setRegistration(PBHelper.convert(registration))
.setXmitsInProgress(xmitsInProgress).setXceiverCount(xceiverCount)
.setFailedVolumes(failedVolumes)
.setRequestFullBlockReportLease(requestFullBlockReportLease);
resp = rpcProxy.sendHeartbeat(NULL_CONTROLLER, builder.build());
return new HeartbeatResponse(cmds, PBHelper.convert(resp.getHaStatus()),
rollingUpdateStatus, resp.getFullBlockReportLeaseId());
}
在connectToNNAndHandshake中,通过ProtobufRpcEngine::getProxy 获得一个bpNamenode 的RPC代理类,调用 bpNamenode.sendHeartbeat时,通过动态代理将消息通过 Client 发送出去。
NameNode
DataNode发送了心跳之后,对应的NameNode会接收到一条对应的请求信息。
通过走读代码,我们找到了同样实现 DatanodeProtocolService 接口的是DatanodeProtocolServerSideTranslatorPB 类。1
2
3
4
5
6public HeartbeatResponseProto sendHeartbeat(RpcController controller,
HeartbeatRequestProto request) throws ServiceException {
return namesystem.handleHeartbeat(nodeReg, report,
dnCacheCapacity, dnCacheUsed, xceiverCount, xmitsInProgress,
failedVolumes, volumeFailureSummary, requestFullBlockReportLease);
}
在 DatanodeProtocolServerSideTranslatorPB::sendHeartbeat 中通过事件分发将心跳事件交给 FSNamesystem 进行消费,从而完成了 DataNode 和 NameNode 的心跳事件。